Hangman
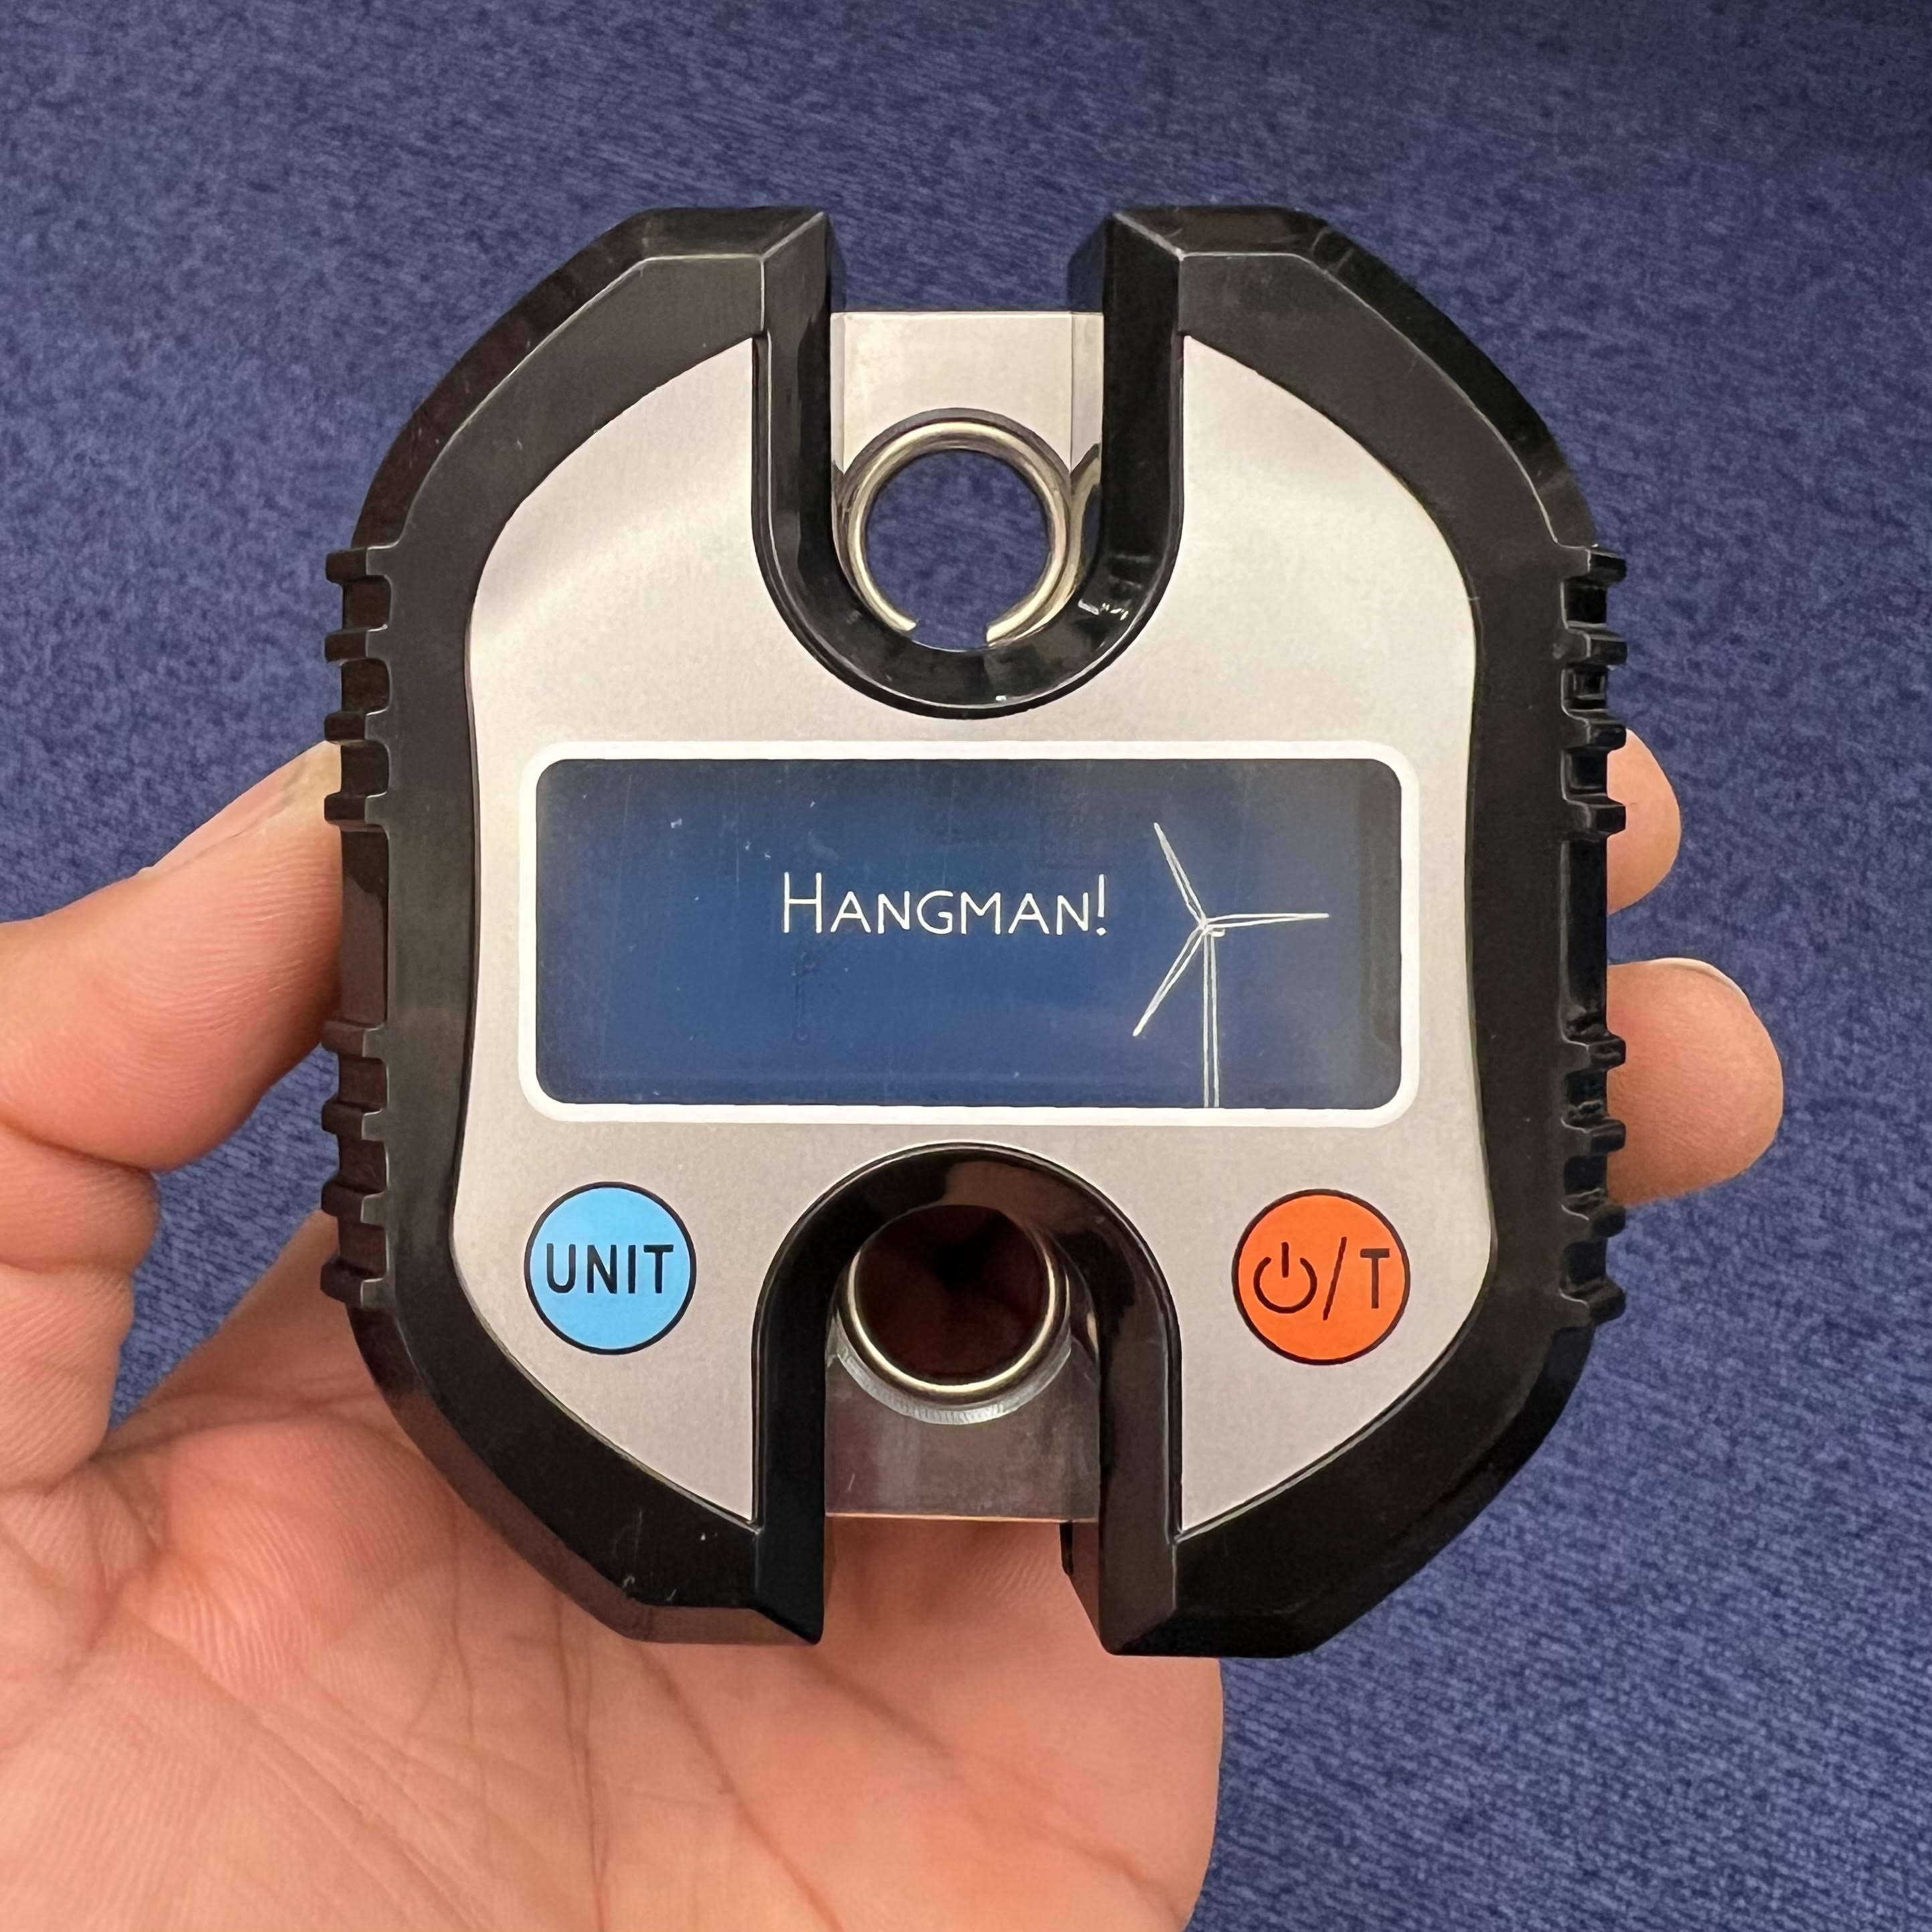
Hangman is a Bluetooth-enabled crane scale. It’s intended use is as a climbing training and rehab tool, but it can be used anywhere that requires measuring force or weight.
The hardware retrofits a cheap (~$23) 150kg crane scale from Amazon with a custom PCB based around a Nordic nRF52 microcontroller and a differential ADC. The firmware uses Embassy, an embedded async framework written in Rust, as well as Nordic’s SoftDevice Bluetooth stack.
Why?
Crane scales have become popular in the climbing community as a means to train and rehab fingers. This is a fun project to learn and practice various concepts I was unfamiliar or rusty with: BLE 101, async Rust on embedded, nRF52 development, SMT soldering and PCB design, etc. Maybe it’ll even help my fingers get stronger.
Status
The scale is feature-complete. Weight measurement works great with the Progressor API and compatible tools. Battery life is guesstimated to be in the range of several months to a couple of years depending on usage.
Disclaimer
This is not an officially supported Google product. Wouldn’t that be funny though?
This has no affiliation with Tindeq.
Assembly
How to assemble the boards into the housings
Instructions
- Test the scale to make sure that it generally works
- Disassemble fully, keep the screws

- Swap over the wires to the new, already populated PCB
- Screw the new PCB back in
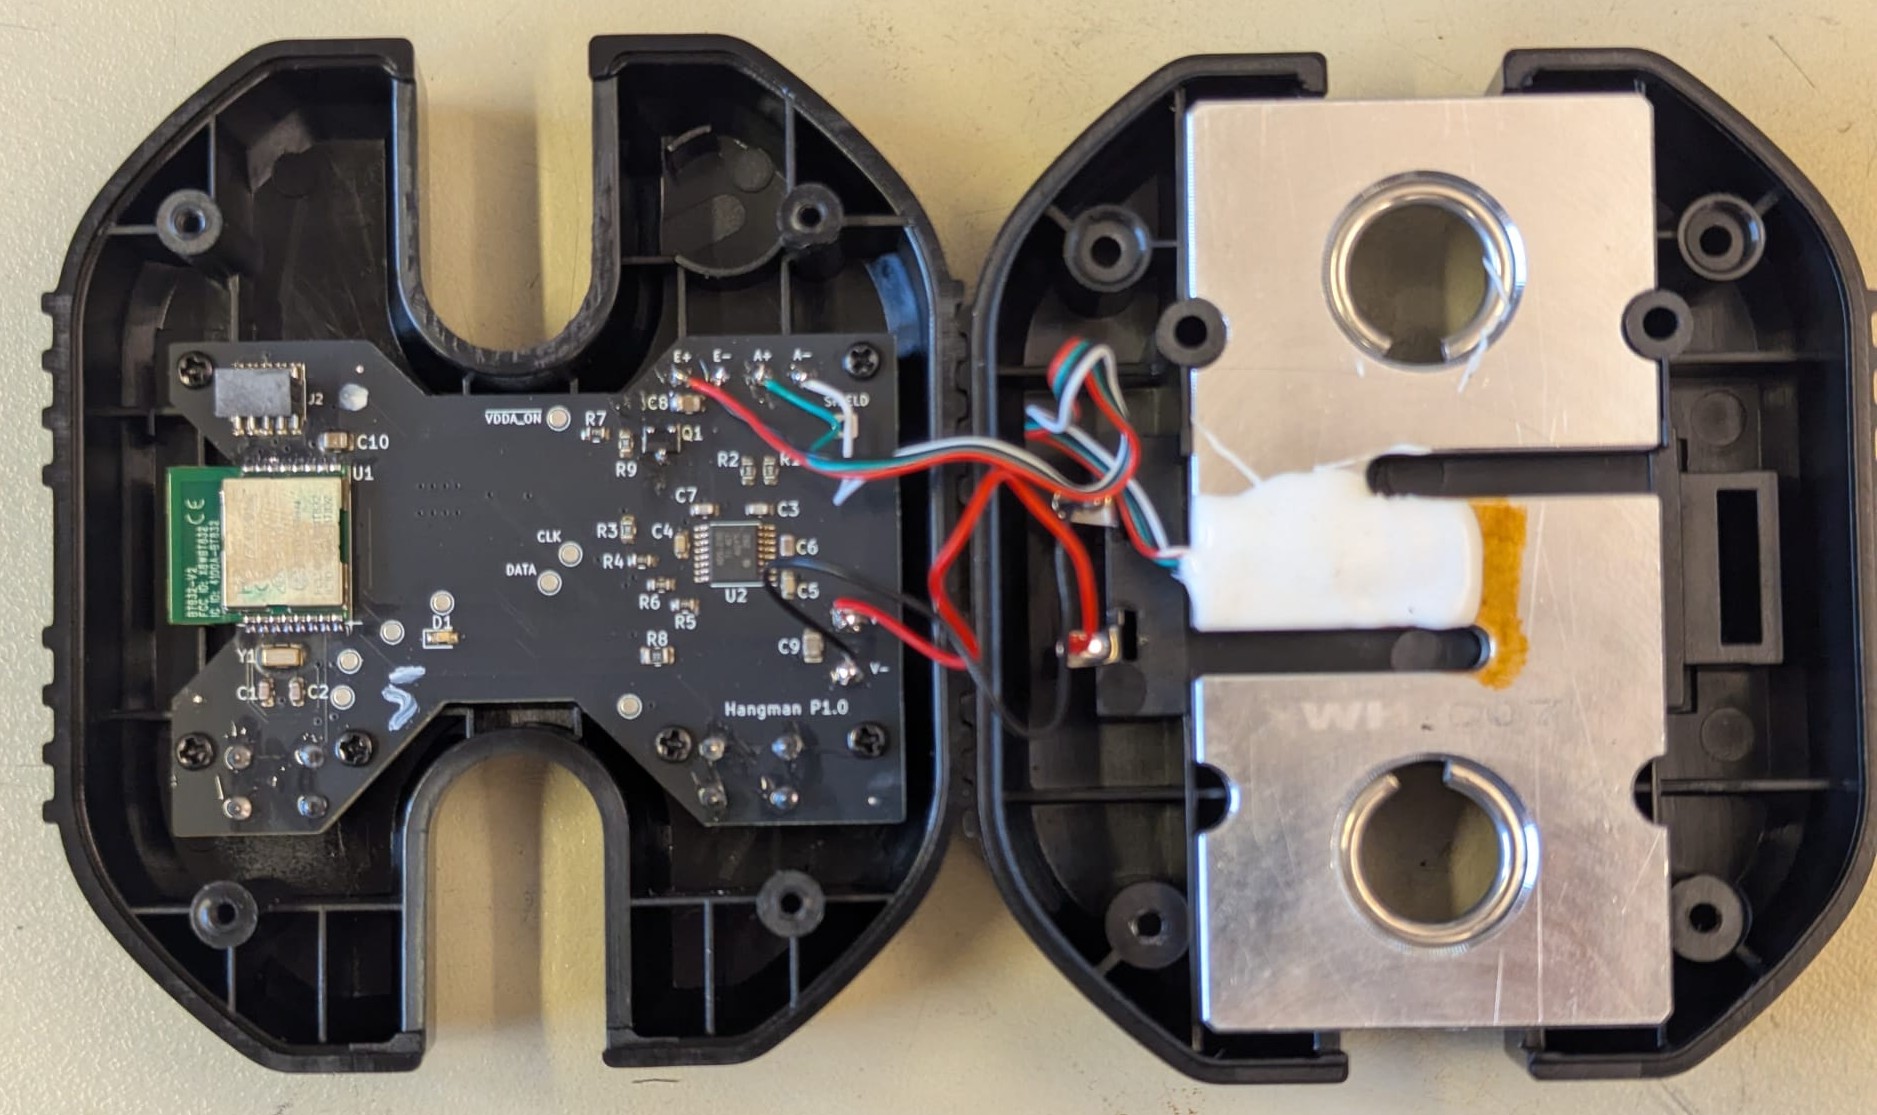
- Measure the voltage input pins for shorts (to prevent stupid errors)
- Power on the board with batteries or a lab bench power supply
- Do the Bringup
- Close the housing and screw it shut, don’t pinch any wires or strip any screws
- Do the Calibration
- Done!
Bringup
How to get the board from being assembled to being functional
nRF Command Line Tools + Segger J-Link
Note that Nordic encourages the use of the nRF Util over nrfjprog. I’ve found nrfjprog to be more reliable in the past and haven’t migrated to nRF Util, but it’s probably not too hard to figure out the equivalent commands.
Prereqs
- Obtain a Segger J-Link debugger
- Download the nRF Command Line Tools
- Download the SoftDevice s113 from https://www.nordicsemi.com/Products/Development-software/S113
Instructions
-
Connect your debugger.
-
Flash the SoftDevice. This generally only needs to be done once.
nrfjprog --family nrf52 --program s113_nrf52_7.2.0_softdevice.hex --chiperase --verify --resetYour .hex filename may differ.
-
Flash the hangman firmware:
DEFMT_LOG=info cargo run --release --bin proto1_0 --features nrf52832
Windows + ST-Link
Instructions using Windows, WSL and a ST-Link
Requirements
- Working WSL2
- ST-Link, with installed drivers (I used a ST-Link V2-1, borrowed from a Nucleo Board)
- Install usbipd-win on windows: run
winget install --interactive --exact dorssel.usbipd-winin a windows terminal - Install required packages in wsl:
sudo apt install build-essential - Install rust: https://rustup.rs/
- Install probe-rs: https://probe.rs/
- Install OpenOCD in WSL:
sudo apt install openocdin wsl - Download the SoftDevice for the chip from NRF (I used s113_nrf52_7.3.0_softdevice.hex)
Flashing
- Connect the ST-Link
- Follow these instructions to get the ST-Link connected to WSL: https://learn.microsoft.com/de-de/windows/wsl/connect-usb
usbipd listusbipd bind --busid <busid>usbipd attach --wsl --busid <busid>- Connect the board to the ST-Link correctly
- Power the board
- Run
openocd -f /usr/share/openocd/scripts/interface/stlink.cfg -f /usr/share/openocd/scripts/target/nrf52.cfg - In a seperate terminal run
telnet localhost 4444 - Use
targetsyou can check that you can see the nrf52 target - Run
init,halt,nrf5 mass_erase,program /full/path/.../s113_nrf52_7.3.0_softdevice.hex verify - Run
exitin telnet shell - Exit OpenOCD with CTRL+C
- Build and flash the code with
cargo run --bin proto1_0 --release - Done! Further flashing etc. should not require reflashing the SoftDevice
Notes
- If you just want to flash the softdevice in one command you can do it like this:
openocd -f /usr/share/openocd/scripts/interface/stlink.cfg -f /usr/share/openocd/scripts/target/nrf52.cfg -c "init; halt; nrf5 mass_erase; program /full/path/.../s113_nrf52_7.3.0_softdevice.hex preverify verify; shutdown"
Sources
- https://www.jentsch.io/nrf51822-flashen-mit-st-link-v2-und-openocd/
- https://github.com/seemoo-lab/openhaystack/wiki/Flashing-nRF-with-OpenOCD—ST-Link
- https://github.com/lupyuen/stm32bluepill-mynewt-sensor/blob/nrf52/scripts/nrf52/flash-boot.sh
- https://www.youtube.com/watch?v=R5wub5ywzTU&t=197s
- https://www.reddit.com/r/embedded/comments/1k9v4vr/stm32_cmake_stlinkv3pwr_on_windows_in_2025/?show=original
- https://github.com/dorssel/usbipd-win/wiki/WSL-support
- https://discuss.ardupilot.org/t/help-setting-up-openocd-with-st-link-in-wsl2/112271
- https://hackmd.io/@aeefs2Y8TMms-cjTDX4cfw/r1fqAa_Da
- https://learn.microsoft.com/de-de/windows/wsl/connect-usb
Calibration
Hangman uses a two-point calibration routine where one of the points is zero. Calibration needs to be run once before use. The generated calibration constants are saved across power cycles so there shouldn’t be a need to be calibrate multiple times, but you can re-calibrate at any time if you feel like the scale is inaccurate.
Instructions
- Install the nRF Connect app or any similar tool that can be used to connect to BLE devices and write data to GATT characteristics.
- Wake up Hangman by pressing the power button.
- Connect to Hangman using nRF Connect. It’ll be named something starting with
Progressor. - Hang “zero” weight from the scale. It’s okay if this isn’t actually zero. What’s important is that you know the difference in weight between this stage and the second calibration point. Any deviation from zero at this point will be tared out later.
- Write the ByteArray
6900000000to the7e4e1703-1ea6-40c9-9dcc-13d34ffead57GATT characteristic. This should be the only writable characteristic. This sends the 0x69 (AddCalibrationPoint) opcode along with 0.0 as a 32-bit float. - Add a known reference weight to the scale, ideally something that’s at or more than the expected maximum weight but less than 150kg, the maximum capacity of the scale.
- Convert the known weight, in kg, to a 32-bit floating point number in little-endian format. Write
69 <your hex bytes here>to the same characteristic as earlier. As an example, if your known weight were 120.0 kg, you would send690000f042. - If you mess up entering in either meaurement, feel free to resend the corresponding command.
- Once you’re set, write
0x6Ato the same characteristic to save the calibration. - At this point, disconnect from Hangman and test it out using the Tindeq mobile app or something compatible.
Tips
- If the measurements are wildly off after calibration, try re-calibrating and using a big-endian float. Different programs disagree on how these bytes should be entered 🤷
- The two calibration points can be written in any order. However, it’s probably a little better to write the zero point first, in case there is some hysteresis.
- 0x69 is the
AddCalibrationPointopcode. - 0x6A is the
SaveCalibrationopcode.